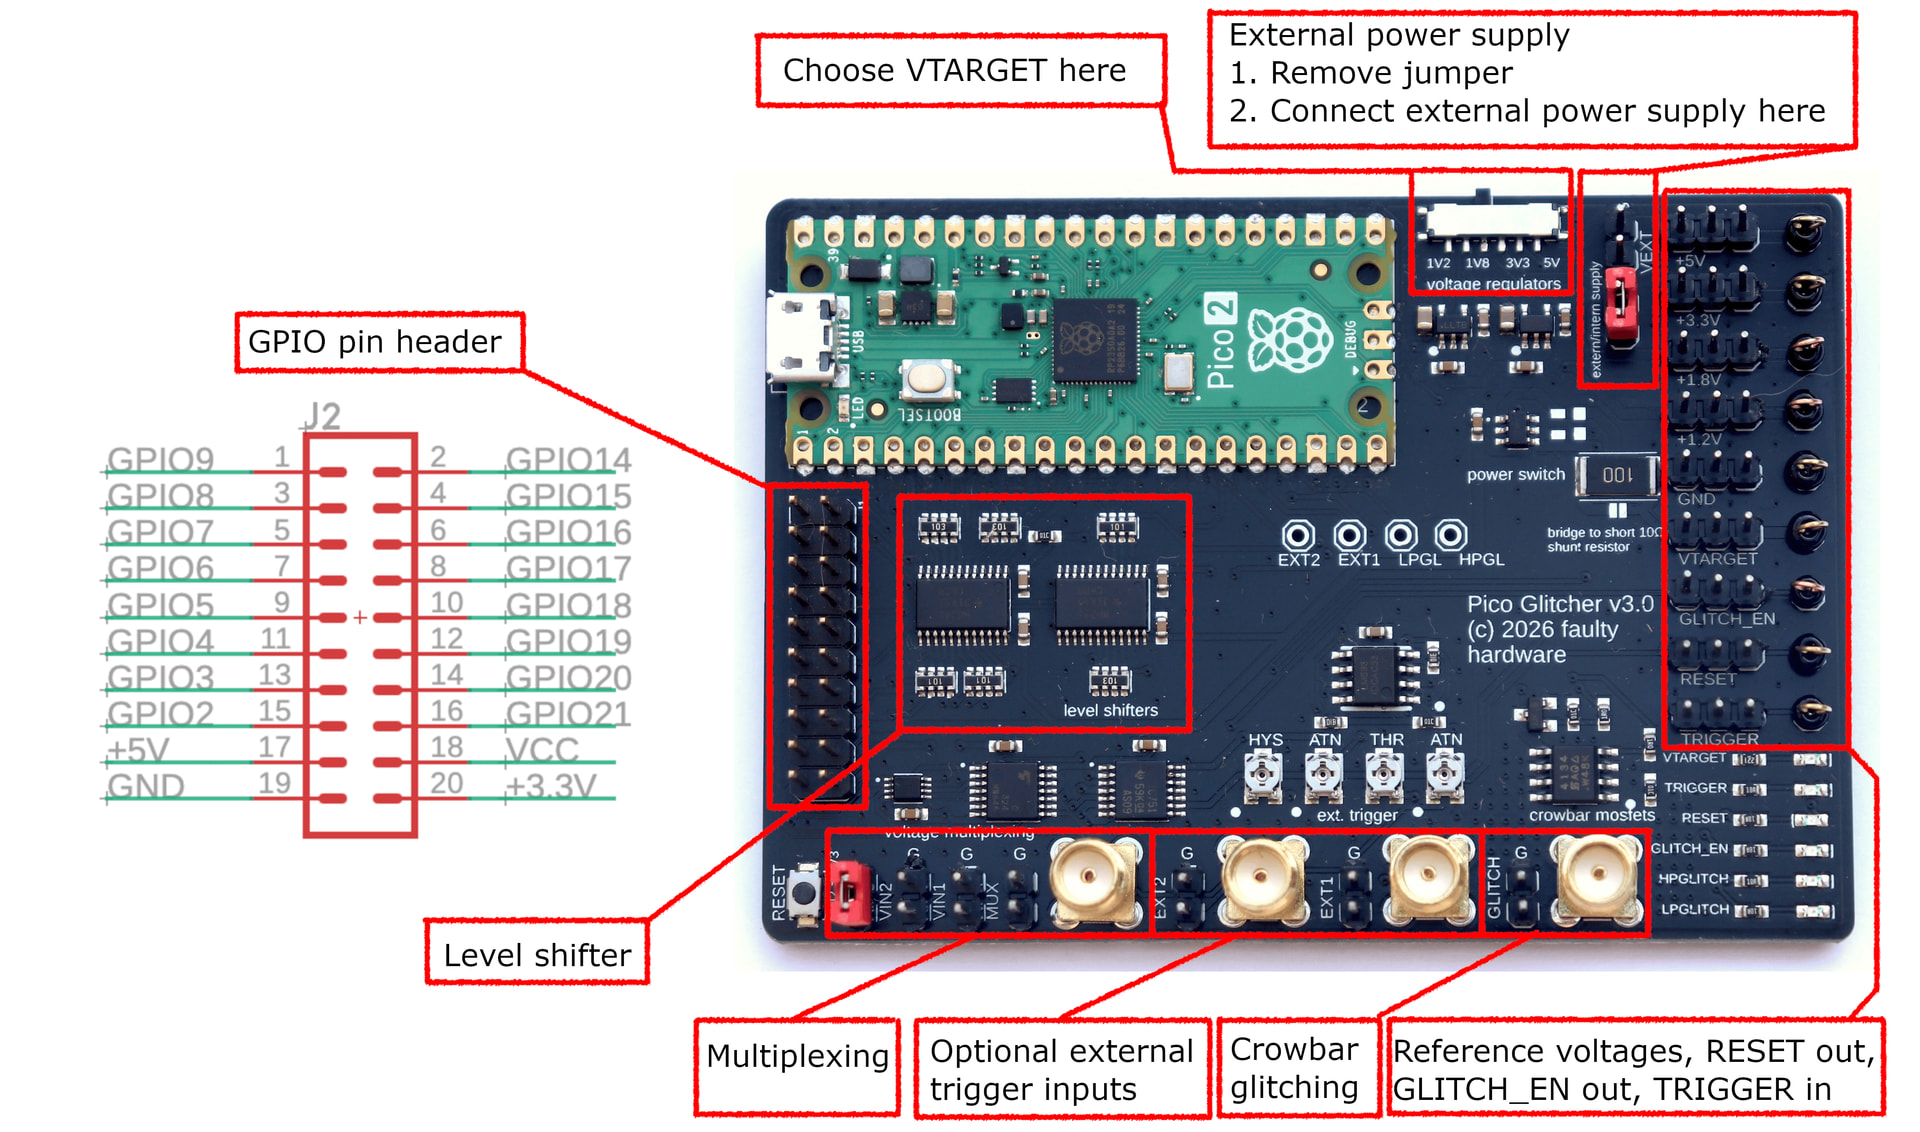
Why should we care to (re)-implement drivers to exploit a glitch and dump all the data with a complex and sometimes expensive FPGA setup, or even a ChipWisperer setup for some targets when we be “more lazy”, and do it for a few bucks with a Raspberry Pi Pico 2w for less than $10?
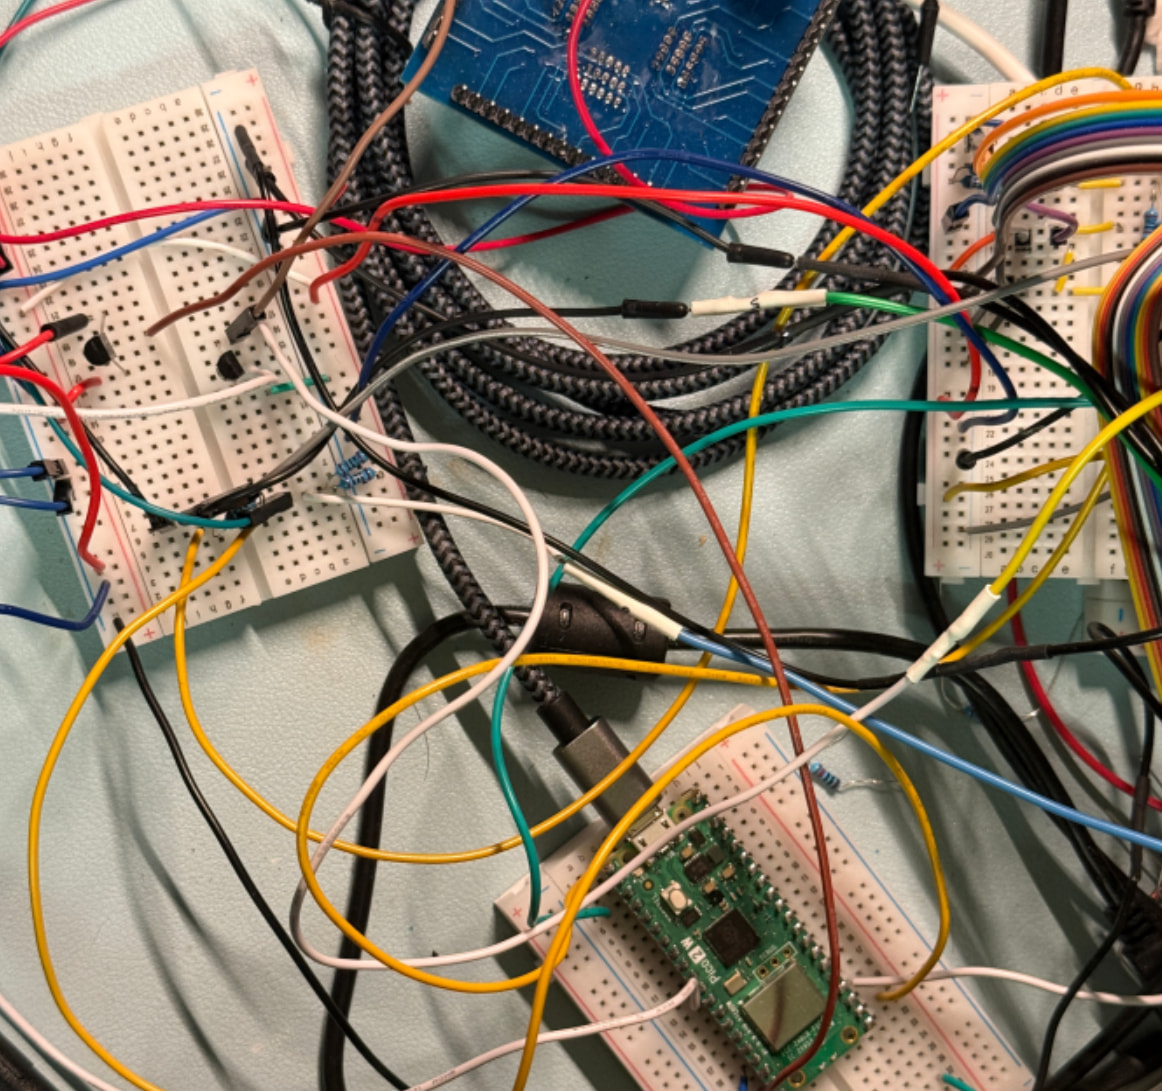
(source: Easy Fault Injection by Traffic Mocking: How to Hack Any Microcontroller with a Raspberry Pi Pico by Tongren Chen (Schen) at CODE BLUE 2025)
I got triggered by a post made by Denis Laskov that highlighted the presentation made by Tongren Chen (Schen) at last Code Blue in Japan. That trigger also reminded me that I didn’t look at the presentation from the last Code Blue presentation in November 2025 yet, so I might probably come with other posts there…
Slides of the presentation can be found with the following link: https://archive.codeblue.jp/2025/files/cb25_How_to_Hack_Any_Micro-controller_with_a_Raspberry_Pi_Pico-Tongren_Chen.pdf
TL;DR of this TL;DR: The idea of this technique is “straightforward”: the Pico pretends to be the debugger by bit-banging the exact same byte sequences a real debugger would send. The victim chip can’t tell the difference. During reconnaissance, you replay the full conversation (works), then trim chunks until things break → identifying which parts are critical (handshake, security check) versus optional, all without understanding what any of those frames actually mean.
Some context…
Precise voltage glitching is a powerful hardware attack that briefly shorts an IC’s power to ground, causing setup time violations that corrupt data or skip instructions (as described by Zussa et al., 2014, and O’Flynn’s ChipWhisperer “crowbar” method, 2016).
The classic attack flow has four steps:
- identify where to glitch,
- capture a digital trigger,
- capture a stop/success signal,
- and exploit → e.g: dump it all!
Previous real-world implementations like the PS4 hack by fail0verflow (2018) and the PS Vita partial compromise by Lu (2019) both required writing full communication protocol drivers which can be a pain in the @**.
The proposed approach: “Record & Replay”
Instead of implementing a whole driver, Chen proposes capturing legitimate traffic between a debugger, and an unlocked/new chip using a logic analyzer, then selectively replaying it against a locked victim. This eliminates the hardest part (frame-level parsing) while preserving the ability to perform all four attack steps.
This comes with two challenges to solve.
Challenge 1: Isolating bidirectional single-wire communication
Protocols like RL78’s TOOL0 line carry traffic from both sides on a single wire. Chen’s solution is: insert a small resistor (100Ω) on the communication line and probe both sides. When either party sends a logic “0,” it pulls the line to ground, becoming effectively the ground reference. The probe on the sender side always reads a lower voltage. Analysis of the voltage delta (ΔV) between the two probes reveals direction:
- When ΔV is large enough, the lower-voltage side is the sender (closer to the ground)
- When ΔV is too small to be certain, it must be the other direction (process of elimination → there are only two possibilities)
That was implemented in the Mocklockingbird/analyzer tool you can find at the end of the post.
Challenge 2: Recording and replaying analog signals
The first two parsing steps (voltage->bit, and bits->byte) are well-documented for commercial chips.
Chen proposed the following pipeline:
- Capture raw data with any logic analyzer (like a DSLogic or even cheaper with a SLogic) at high sampling rate (5 Msps), producing several GB of raw voltage/timestamp data,
- Identify rising/falling edges to reduce data volume,
- Apply documented bit/byte extraction logic (start bit, 8 data bits LSB-first, stop bits) to convert raw captures into timestamped bytes with direction
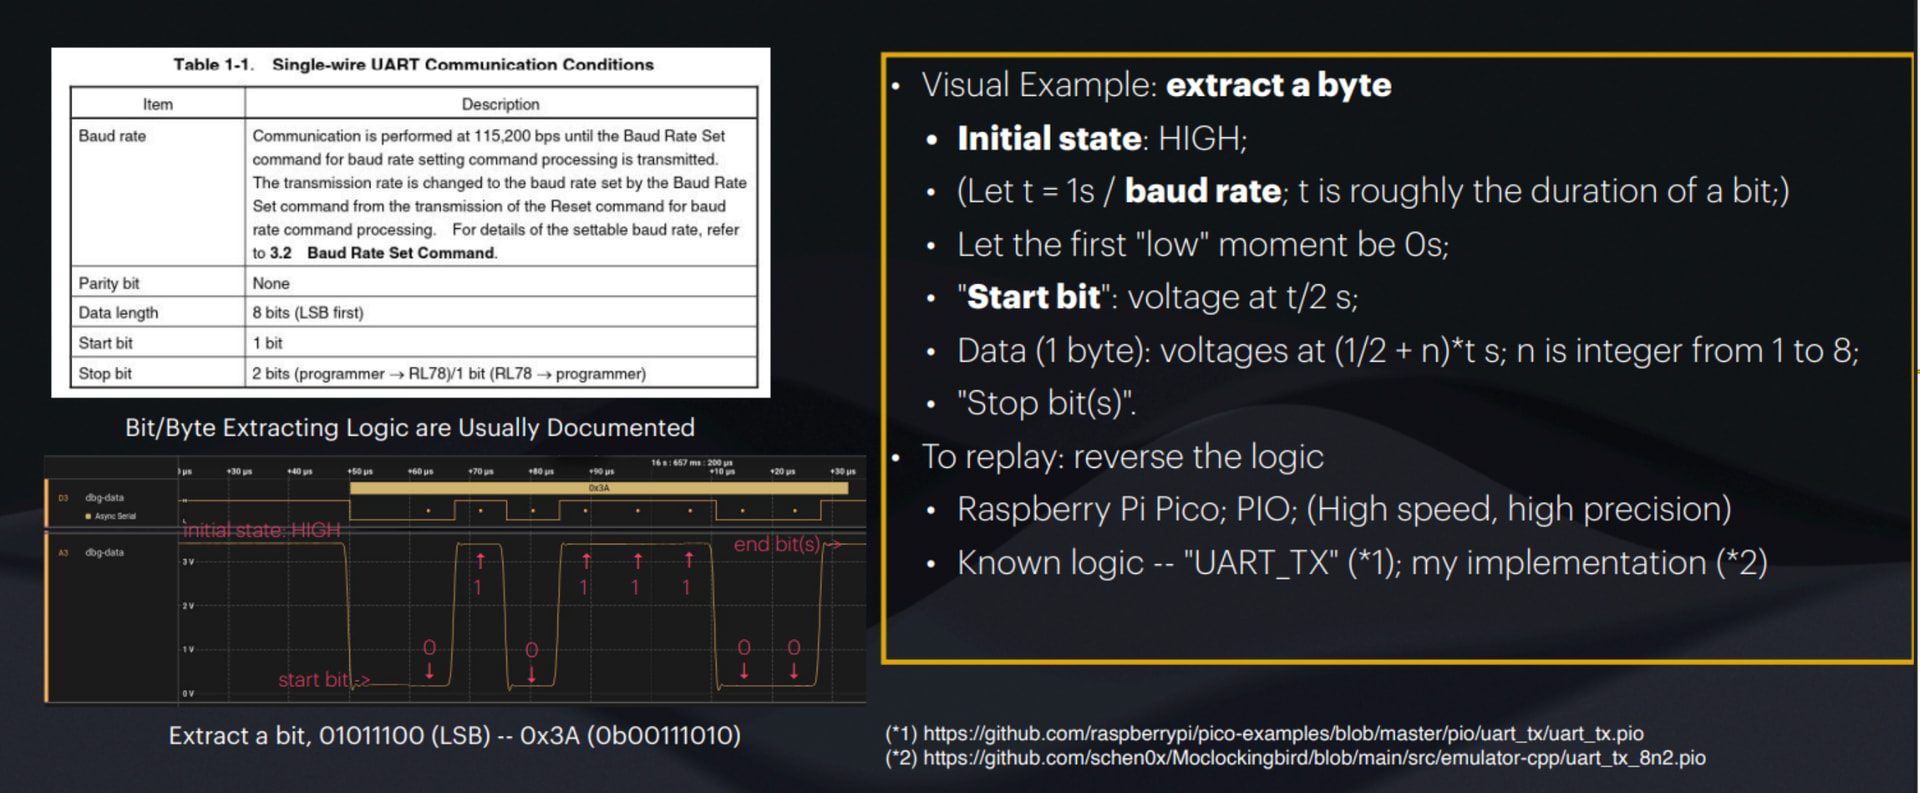
(source: Easy Fault Injection by Traffic Mocking: How to Hack Any Microcontroller with a Raspberry Pi Pico by Tongren Chen (Schen) at CODE BLUE 2025)
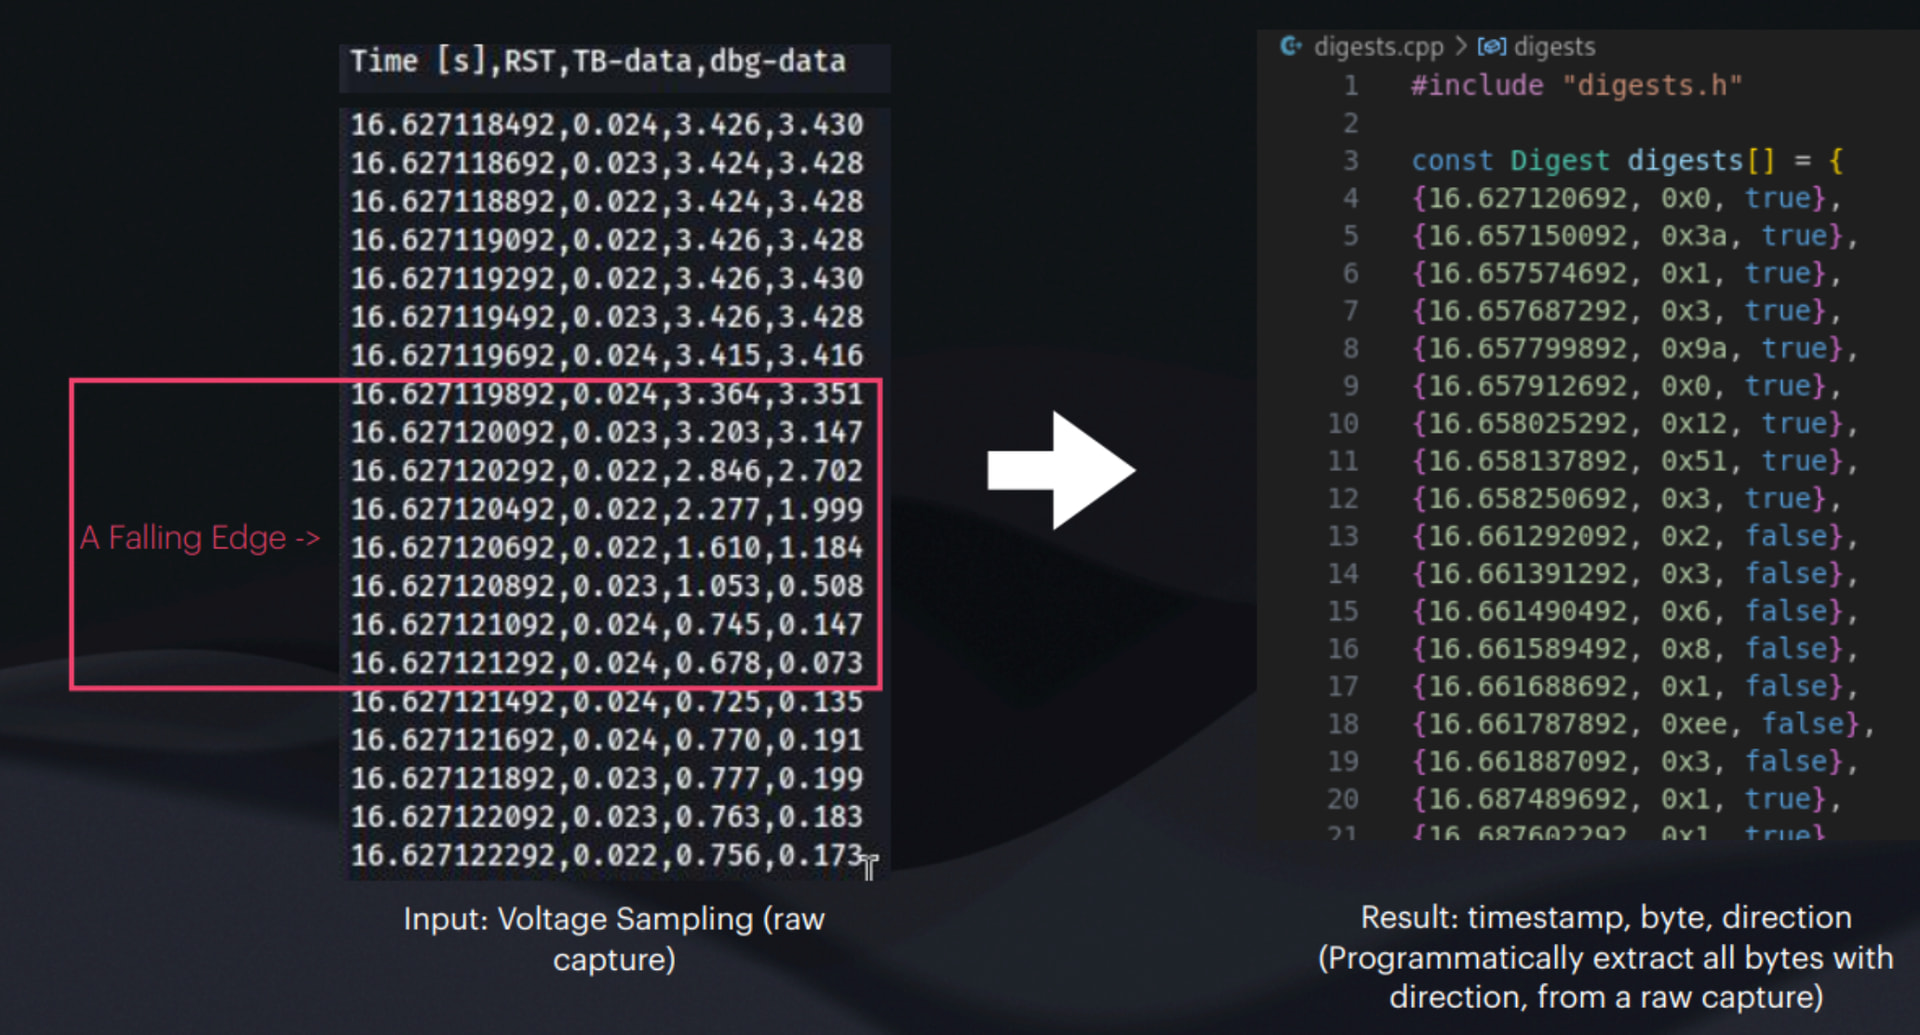
(source: Easy Fault Injection by Traffic Mocking: How to Hack Any Microcontroller with a Raspberry Pi Pico by Tongren Chen (Schen) at CODE BLUE 2025)
For replay, the process reverses: bytes are transmitted via Raspberry Pi Pico’s PIO engine using standard UART TX logic. The implementation Moclockingbird/analyzer again programmatically extracts all bytes with direction from raw captures and the Schen made his own implementation on the Pico following the official example.
Proof of Concept on the Renesas RL78 target (R5F10PLJ)
Reconnaissance phase
- Capture good traffic: set up a new/unlocked chip with an E2 Lite debugger, dump memory while capturing all communication,
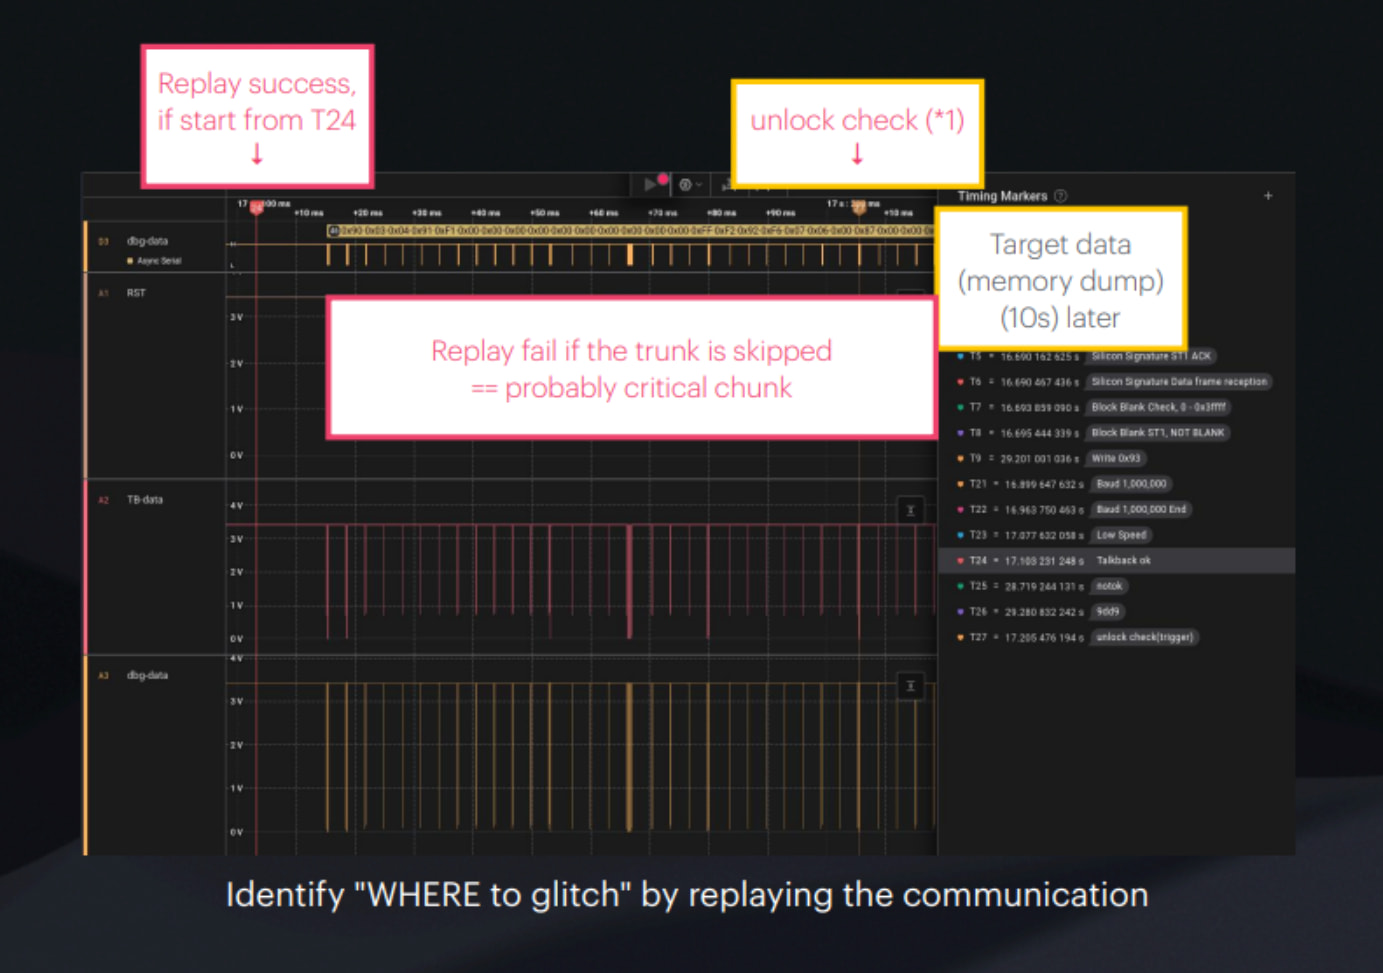
- Identify critical chunks: replay from start to end (works), then progressively narrow down to find which trunks are essential vs. optional.
- Key findings:
- a handshake trunk (including baud rate negotiation, documented in Renesas specs)
- an unlock check sequence: debugger sends security ID (all zeros) + 0xFF checksum, chip replies with 1 status byte
- Digital trigger: since the attacker controls the send side, pause before sending the last byte of the unlock sequence sending that final byte becomes the trigger,
- Stop signal: compare traffic from successful unlock, failed unlock, and other scenarios on an unlocked chip. The success signal is 0xF2 (“Unlock OK”),
- Exploit commands: simply replay the trunks that precede the target data extraction with a little trick: prepend magic bytes (e.g., “9dd9”) to the firmware for easy locating of target data in memory dumps.
(source: Easy Fault Injection by Traffic Mocking: How to Hack Any Microcontroller with a Raspberry Pi Pico by Tongren Chen (Schen) at CODE BLUE 2025)
The setup and attack phase
(source: Easy Fault Injection by Traffic Mocking: How to Hack Any Microcontroller with a Raspberry Pi Pico by Tongren Chen (Schen) at CODE BLUE 2025)
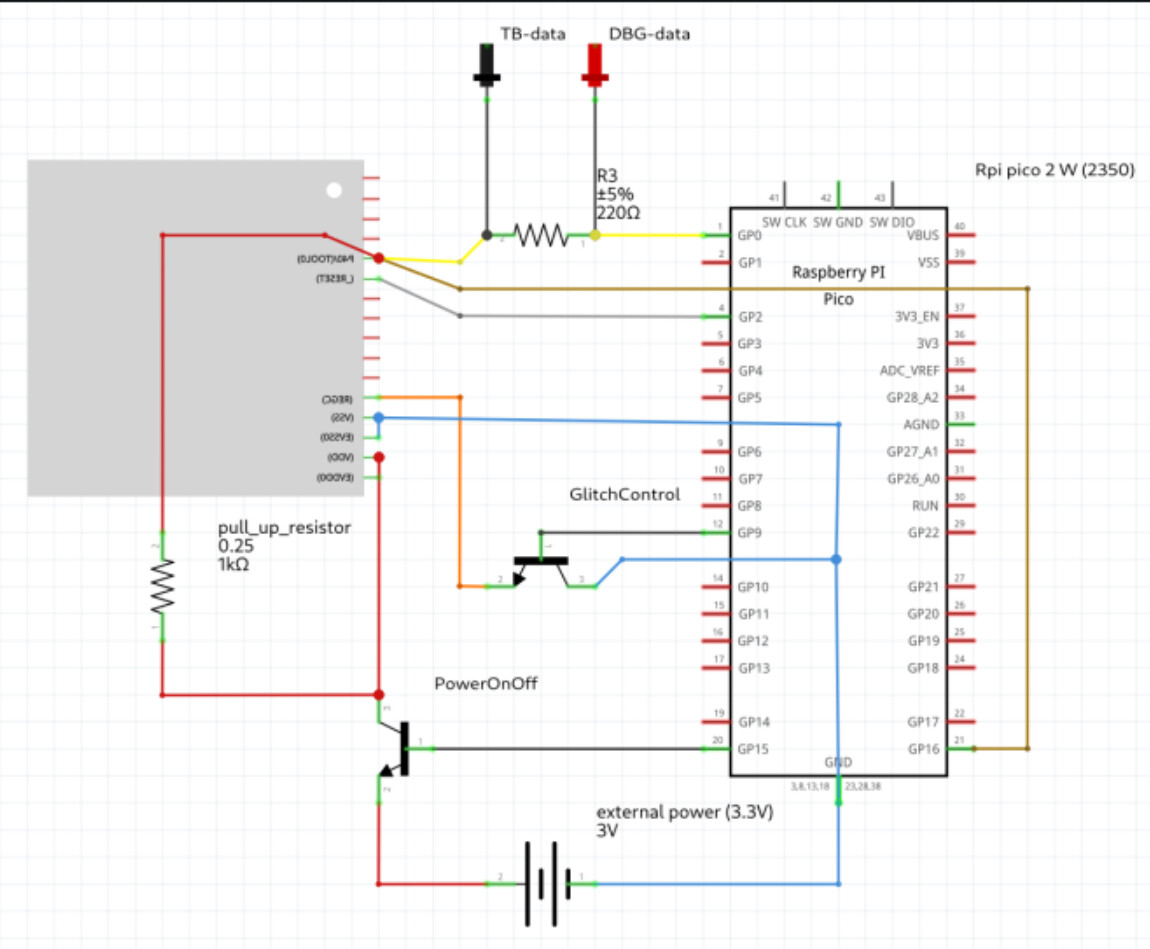
For that we need:
- Raspberry Pi Pico 2 W (RP2350): Two cores, PIO engine with 9-instruction assembly set where every instruction executes in exactly one clock cycle. At 125MHz, the minimum on/off transition is ~16ns (2 instructions, 2 clocks),
- Two NPN transistors (high-speed switches): either S8050D331 BJTs or FDS8949 MOSFETs,
- Glitch switch: shorts the chip’s REGC pin (core voltage regulator) to ground when Pico briefly activates the base/gate,
- Power switch: allows rebooting the target chip without rebooting the Pico (preserving glitch parameter state).
Note: More details can be found on the slides and the presentation on the wiring.
Interesting with the Pico is that it can run two programs with a neat accuracy. And more can be found about it looking at Stacksmashing YT channel there:
In-depth: Raspberry Pi Pico’s PIO - programmable I/O!
So! Here is the Dual-core logic in action:
- Core 0 (main): Runs
task_tx0(): sends all traffic up to the trigger, signals Core 1, sends the final trigger byte, waits a parameterized delay, then fires the glitch - Core 1: Runs
task_rx(): waits for Core 0’s IRQ, then continuously monitors the chip’s response, forwarding the first 2 received bytes to Core 0 for inspection - Core 0 checks if the 2nd byte equals 0xF2 (success). If yes → replay data extraction commands. If no → reboot target, adjust parameters, retry
Results
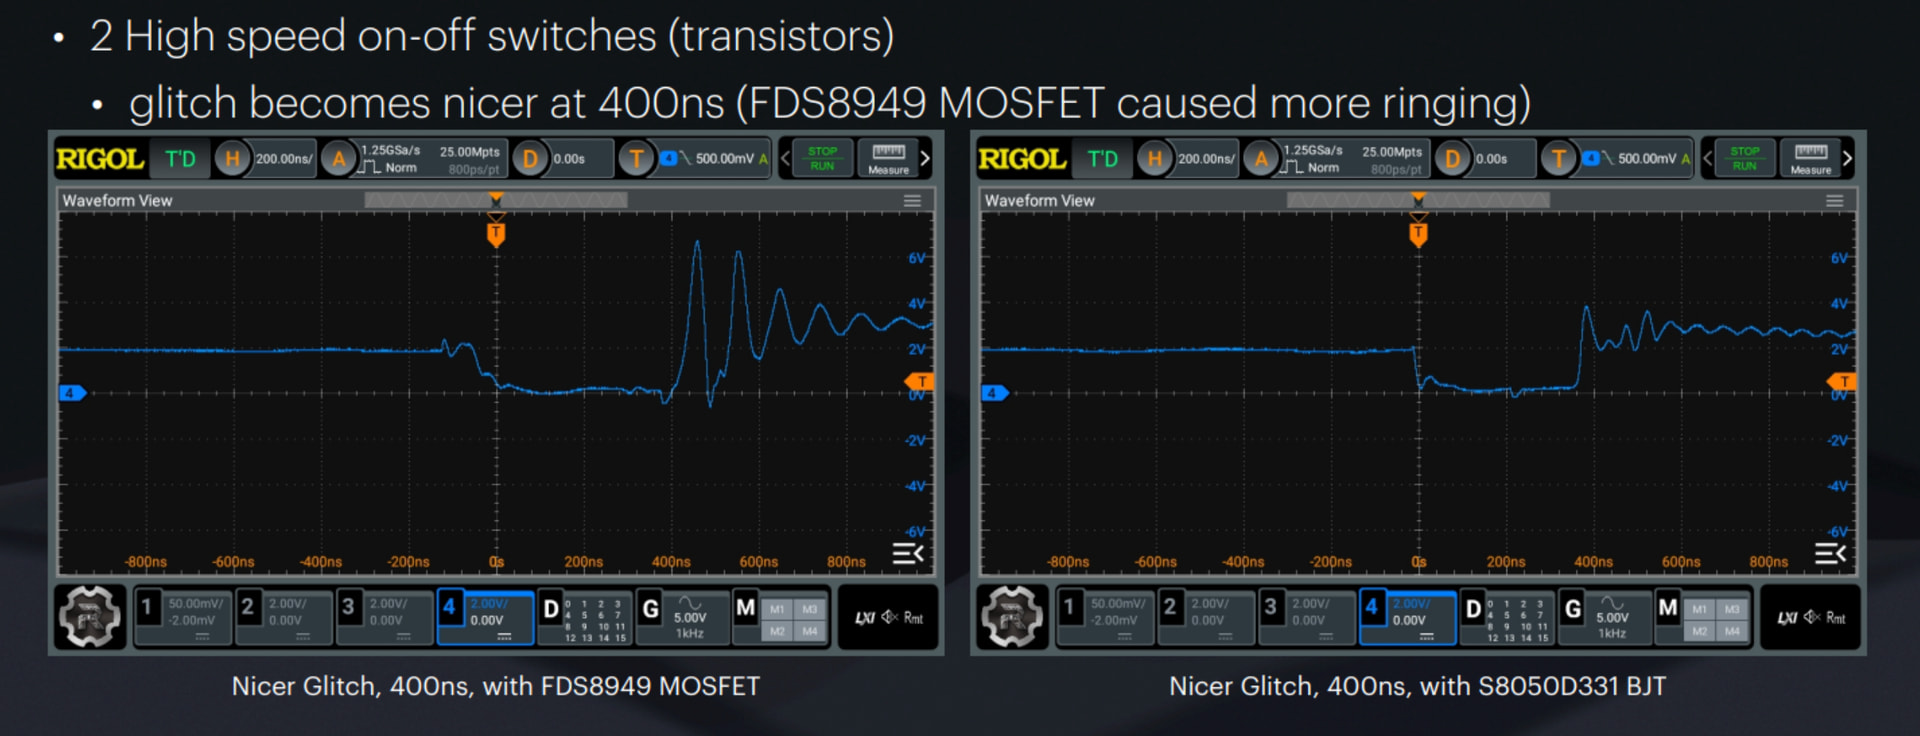
For glitch, two ON-OFF switches (transistors) were tested/compared:
- FDS8949 MOSFET: 150ns glitch → nice but has some ringing and bit noisy; at 400ns looks better but need to use a a flyback diode component to reduce the ringing → ,
- S8050D331 BJT: 150ns glitch → better looking but still some ringing; at 400ns → was cleaner overall.
(source: Easy Fault Injection by Traffic Mocking: How to Hack Any Microcontroller with a Raspberry Pi Pico by Tongren Chen (Schen) at CODE BLUE 2025)
Then we are ready to:
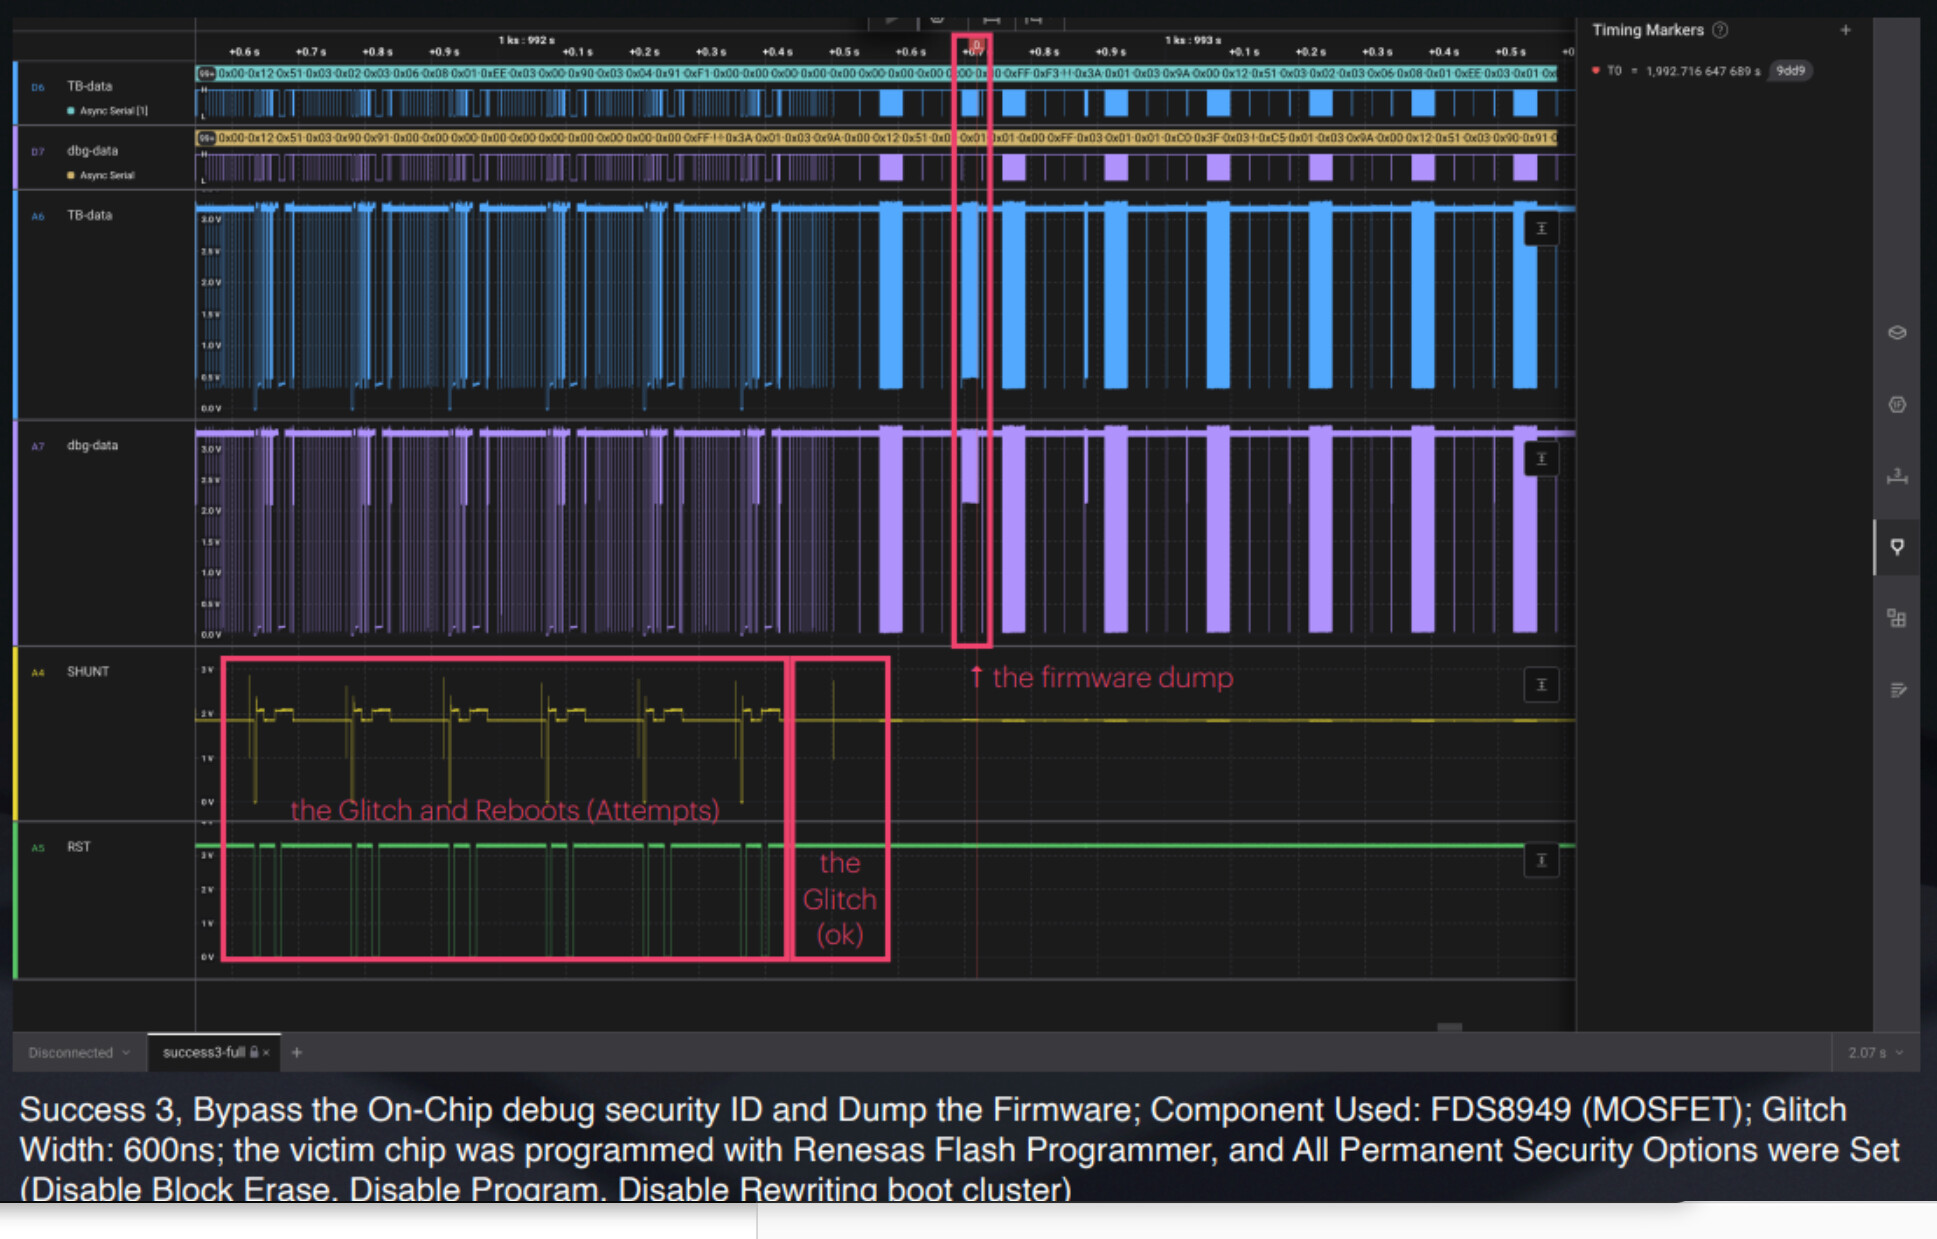
- Glitch at digital trigger,
- Stop signal: if success → replay the data extraction command (the lazy way), then stop execution; if fails → reboot the target and use next glitch parameter and retry
- Then we dump the firmware with all permanent security options enabled (block erase disabled, program disabled, boot cluster rewriting disabled)
What’s valuable is the methodology: a generic, low-cost, target-independent approach to precise voltage glitching that replaces driver implementation with traffic capture and replay. For anyone doing hardware security assessments on microcontrollers with debug interfaces, this is a practical tool in the toolbox.
(source: Easy Fault Injection by Traffic Mocking: How to Hack Any Microcontroller with a Raspberry Pi Pico by Tongren Chen (Schen) at CODE BLUE 2025)
Resources
- The video of the presentation: https://www.youtube.com/watch?v=hR_4U0hddnE&t=10s
- Full source code of the attack can be found there: GitHub - schen0x/Moclockingbird: To mock a serial traffic
- And here are heavy slides again with tons of nice screenshots: https://archive.codeblue.jp/2025/files/cb25_How_to_Hack_Any_Micro-controller_with_a_Raspberry_Pi_Pico-Tongren_Chen.pdf
I hope these few notes will be useful for you, at least that will be indexed here.